
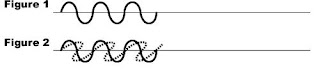
Light waves as it travels. As shown in Figure 1, light may seem to travel unidirectionally. In actuality light travels in all directions as shown in Figure 2.
When light, which waves in all directions, goes through a grating placed in its course of travel, only the light wave that oscillates in the direction parallel to the bars of the grating passes through, Light waves that oscillate in other directions get blocked by the bars of the grating. ( Figure 3 ) Such light, which waves in one particular direction, is called polarized light, and the grating is called a polarizing plate.
 When polarized light travels through in a polarimeter an observation tube filled with a sample solution that does not make light rotate (water, for example), the light continues to wave in the same direction even after passing through the solution. ( Figure 4 )

In contrast, when it travels through in a polarimeter an observation tube filled with a sample solution that makes light rotate (sucrose solution, for example), the light wave begins to rotate as it passes through the solution. (Figure 5) This is called optical rotation.
 Those samples that make light rotate have a molecular formula that contains asymmetric carbon ( indicated by "C" ) . Sugar is the most common. The explanation of the asymmetric carbon can be highly technical. Imagine making a light path by placing a polarizing plate, an observation tube, another polarizing plate, and a sensor one after another. (Figure 6 and 7). The path in Figure 6 has an observation tube filled with water, in Figure 7 a sample solution, such as sucrose solution, that makes light rotate, such as you would find in a polarimeter.
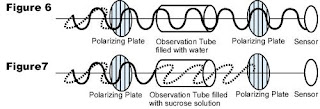
In Figure 6 a certain amount of light reaches the sensor.
In Figure 7 the light does not reach the sensor. (Technically speaking, in terms of a vector an imperceptible amount of light does reach the sensor, but let's assume that the light does not reach the sensor here. )
When the second polarizing plate is rotated as shown in Figure 8, the same amount of light as in Figure 6 now reaches the sensor.
 Conducting Zero-Setting on a Polarimeter
Conduct zero-setting in the step shown in Figure 6. In the actual adjustment procedure, the observation tube filled with water is not necessary and zero-setting is conducted by letting light travel through the air. Next, place an observation tube filled with a sample solution that makes light rotate as shown in Figure 8. Rotate the second polarizing plate so that the equal amount of light reaches the sensor as it did when zero-setting was conducted. The measured angle of the rotated polarizing plate is the angle of rotation of the sample solution.

When light, which waves in all directions, goes through a grating placed in its course of travel, only the light wave that oscillates in the direction parallel to the bars of the grating passes through, Light waves that oscillate in other directions get blocked by the bars of the grating. ( Figure 3 ) Such light, which waves in one particular direction, is called polarized light, and the grating is called a polarizing plate.
 When polarized light travels through in a polarimeter an observation tube filled with a sample solution that does not make light rotate (water, for example), the light continues to wave in the same direction even after passing through the solution. ( Figure 4 )
In contrast, when it travels through in a polarimeter an observation tube filled with a sample solution that makes light rotate (sucrose solution, for example), the light wave begins to rotate as it passes through the solution. (Figure 5) This is called optical rotation.
 Those samples that make light rotate have a molecular formula that contains asymmetric carbon ( indicated by "C" ) . Sugar is the most common. The explanation of the asymmetric carbon can be highly technical. Imagine making a light path by placing a polarizing plate, an observation tube, another polarizing plate, and a sensor one after another. (Figure 6 and 7). The path in Figure 6 has an observation tube filled with water, in Figure 7 a sample solution, such as sucrose solution, that makes light rotate, such as you would find in a polarimeter.
In Figure 6 a certain amount of light reaches the sensor.
In Figure 7 the light does not reach the sensor. (Technically speaking, in terms of a vector an imperceptible amount of light does reach the sensor, but let's assume that the light does not reach the sensor here. )
When the second polarizing plate is rotated as shown in Figure 8, the same amount of light as in Figure 6 now reaches the sensor.
 Conducting Zero-Setting on a Polarimeter
Conduct zero-setting in the step shown in Figure 6. In the actual adjustment procedure, the observation tube filled with water is not necessary and zero-setting is conducted by letting light travel through the air. Next, place an observation tube filled with a sample solution that makes light rotate as shown in Figure 8. Rotate the second polarizing plate so that the equal amount of light reaches the sensor as it did when zero-setting was conducted. The measured angle of the rotated polarizing plate is the angle of rotation of the sample solution.
Author Name: Kathy Brasch : Nationalmicroscope.com


